Reviving a classic Nokia phone with the Phoenix Service Tool often presents immediate obstacles: finding a safe, adware-free installer, resolving persistent driver conflicts on Windows 10 or 11, and understanding the critical difference between a “Refurbish” and a “Firmware Update.” This guide provides a direct, technical procedure to overcome these exact issues. We deliver vetted download sources, a precise driver installation method, the exact folder structure you need, and a complete walkthrough of the flashing process. This is the standard operating procedure for successfully restoring, debranding, or repairing your Symbian and S40/S60 devices.
Step 1: Assemble Your Toolkit (Vetted Downloads)
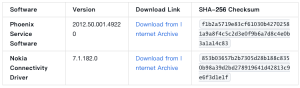
Acquiring a clean, unmodified version of Phoenix and the correct drivers is the most important step. Unofficial sources frequently bundle installers with adware. The links below are to trusted archives. To ensure a safe installation, you must also verify each file’s integrity using its SHA-256 checksum. A checksum is a unique digital fingerprint; if the checksum of your download matches the one listed here, you can be confident it is the original, unaltered file.
Required Software Downloads
Pro-Tip: How to Verify a Checksum
You can easily verify the file hash on Windows. Open Windows PowerShell, navigate to your downloads folder using the cd command, and then run: Get-FileHash Your-File-Name.exe | Format-List. Compare the resulting SHA256 value with the one in the table above.
Step 2: The Critical Firmware Folder Setup
This step is mandatory and is the most common reason a flash fails before it even begins. Phoenix will not find your firmware files unless they are placed in a specific directory. You must create this folder structure manually.
1. Navigate to C:\Program Files (x86)\Nokia\. If this path does not exist, you will create it after installing Phoenix in the next section.
2. Inside the Nokia folder, create a new folder named Phoenix.
3. Inside the Phoenix folder, create a new folder named Products.
4. Inside the Products folder, you must create a folder named exactly after your phone’s RM-model number (e.g., RM-596 for the Nokia N8). You can find this model number on the sticker underneath the battery.
5. Place all your downloaded firmware files (.mcu, .ppm, .cnt, etc.) directly into this RM-XXX folder.
Your final file path should look exactly like this:
C:\Program Files (x86)\Nokia\Phoenix\Products\RM-596\
Step 3: A Clean Installation for Phoenix and Drivers
Follow this checklist precisely to prevent common installation errors and driver conflicts.
1. Uninstall Conflicting Software: Go to “Apps & features” in Windows Settings. Methodically uninstall any existing versions of Nokia PC Suite, Nokia Ovi Suite, and any related Nokia cable drivers. These legacy packages will cause conflicts.
2. Reboot Your Computer: After uninstalling all old software, restart your computer. This is a non-negotiable step to clear any loaded driver files from memory.
3. Install Phoenix Service Software:
- Find the Phoenix_Service_Software_2012.50.001.49220.exe you downloaded.
- Right-click the installer and select “Run as administrator.” This is essential.
- Proceed through the setup, accepting the license agreement and ensuring all default components are selected.
- Do not launch Phoenix yet.
4. Install the Connectivity Driver:
- Find the Nokia_Connectivity_Cable_Driver_7.1.182.0.msi you downloaded.
- Right-click the installer and select “Run as administrator.“
- Complete the installation.
Step 4: The Essential Windows 10/11 Driver Fix
Phoenix was not designed for modern Windows, making stable driver connections the most common point of failure. If your device isn’t detected, follow these steps.
1. Disable Driver Signature Enforcement (If Required): Windows 10 and 11 may block the unsigned drivers necessary for flashing. To temporarily bypass this, you must reboot into Test Mode.
- Open Command Prompt as an administrator.
- Execute the command: bcdedit /set testsigning o
- Reboot your PC. A “Test Mode” watermark will appear on your desktop, confirming the change.
- Note: To turn it off later, use the command bcdedit /set testsigning off and reboot.
2. Verify the Device Connection:
- Power off your Nokia phone completely.
- Connect it to your PC with a high-quality USB cable, preferably using a port on the back of the computer.
- Windows should begin installing drivers. Open Device Manager and look under “Universal Serial Bus devices.”
- You should see a “Nokia USB Flashing Parent” device or a similar entry. Confirming this before launching Phoenix is the key to a successful flash.
Step 5: The Step-by-Step Flashing Procedure in Phoenix
With your software installed, drivers working, and firmware in the correct folder, you are ready to flash.
1. Launch Phoenix: Right-click the Phoenix shortcut and select “Run as administrator.”
2. Configure the Connection: In the main toolbar, the “Connections” dropdown should be set to NO CONNECTION.
3. Load the Product Profile:
- Click File > Open Product.
- A list of RM models will appear. Type your phone’s model (e.g., RM-596) into the filter box and select it. Click OK.
4. Open the Flashing Window: Click Flashing > Firmware Update.
5. Select the Product Code:
- In the “Firmware Update” window, you will see your firmware details. Click the “…” button next to the “Product Code” field.
- A new window will open listing the available product codes from the firmware you downloaded. Select the one that matches your desired region or debranded variant. Click OK.
6. Choose the Flashing Operation:
- For a bricked or dead phone, you must check the “Dead phone USB flashing” box.
- Click the Refurbish button to begin the flashing process. (See the next section for a detailed explanation of when to use Refurbish vs. Firmware Update).
7. Follow On-Screen Instructions: Phoenix will now display a pop-up with instructions. It will typically ask you to:
- Disconnect the USB cable.
- Ensure the phone is powered off.
- Press the power button on the phone briefly (for less than a second).
- Immediately reconnect the USB cable.
- Click OK in the pop-up to start.
The flashing process will now begin. Do not disconnect the phone or use the computer until you see a “Flashing Completed” message.
Refurbish vs. Firmware Update: Choosing Your Operation
Phoenix offers several operations, and choosing the correct one is critical.
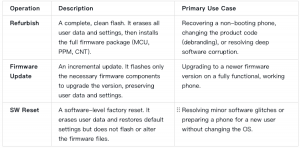
Use this scenario-based guide to select the right technique:
- If your phone is bricked (does not turn on), your only option is to Refurbish It. You must also select the “Dead phone USB flashing” checkbox.
- If you want to debrand your phone, you must use Refurbish. This is the only operation that applies a new product variant from a different firmware package.
- If your phone works but you want the latest software, use Firmware Update. This is the safest method for a simple version upgrade, as it preserves your data.
- If your phone is slow or buggy, first attempt a software reset. If problems persist, back up your data and then perform a Refurbish for a completely clean software installation.
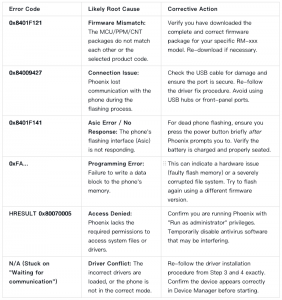
Troubleshooting: How to Fix a Failed Flash
A failed flash can be resolved by analyzing the error codes in the output log. Before any attempt, ensure your phone’s battery is at least 50% charged.
Frequently Asked Questions About the Phoenix Service Tool
Does Phoenix Service Tool work on 64-bit versions of Windows 10/11?
Yes, it does. The software itself is a 32-bit application, which is why it installs to the Program Files (x86) directory, but it functions correctly on 64-bit systems. The key is to run it as an administrator and follow the driver fix procedure.
What should I do if my RM-model is not listed when I click “File > Open Product”?
This almost always means the firmware is not in the correct folder. Double-check that you have created the path C:\Program Files (x86)\Nokia\Phoenix\Products\RM-XXX and that your firmware files are directly inside that RM-XXX folder.
Is it safe to change my phone’s product code to debrand it?
Yes, this is a very common and generally safe procedure. The “Refurbish” operation is designed for this. However, it is a good practice to write down your phone’s original product code from the sticker under the battery. This allows you to find the original firmware and restore it to its factory state later if you wish.
My phone keeps disconnecting during the flash. What can I do?
First, use a high-quality, short USB cable connected to a port directly on the motherboard (the back of your PC). Avoid front-panel ports and USB hubs. Second, ensure your phone’s battery is charged to at least 50%. An unstable power supply from a low battery can cause disconnections.
Conclusion
Mastering the Phoenix Service Tool depends on a methodical approach. The key to a successful flash is preparation: starting with a verified installer and the correct drivers, building the exact firmware folder structure, and carefully following the in-software steps. By using this guide, you have the complete procedure to overcome the most common obstacles and bring your classic Nokia device back to life.