“It seems some important files on my iPhone 7 are lost accidentally. Luckily, I have backup my iPhone 7 to iTunes previously and I want to restore my iPhone with iTunes to get the lost data back. But I don’t know how to make it.”
As iPhone users, some of you may meet the same problem as above. So, in this article, I will show you how to restore your iPhone 7 with iTunes to get back lost data like contacts, messages and Camera Roll pictures. Besides, if your iTunes not working to restore data, this post also supplies you some tips.
What You Need Before Starting
- An iPhone 7.
- One USB cable for your iPhone 7.
- One computer in Windows or Mac.
- iTunes.
How to Restore iPhone 7 from iTunes backup
Apple offers you the way to restore your iPhone 7 using iTunes to get back lost data or migrate data to new device. If you have created iTunes backup, now you can start restoring now.
Before starting, you need to manually turn off Find My iPhone in Setting > iCloud on your iPhone 7. And you ‘d better update iTunes to be latest, which ensures that your iTunes can be completely compatible with your new iPhone 7.
Restore iPhone 7 going to device management panel
Step 1. Open iTunes and connect your iPhone 7 to computer via USB cable. (If it’s the first time to connect your device to computer, you need to download and install a driver on computer to make your device recognized by your computer).
Step 2. If a message requires you to unlock your device, Trust This Computer or something else, just follow it.
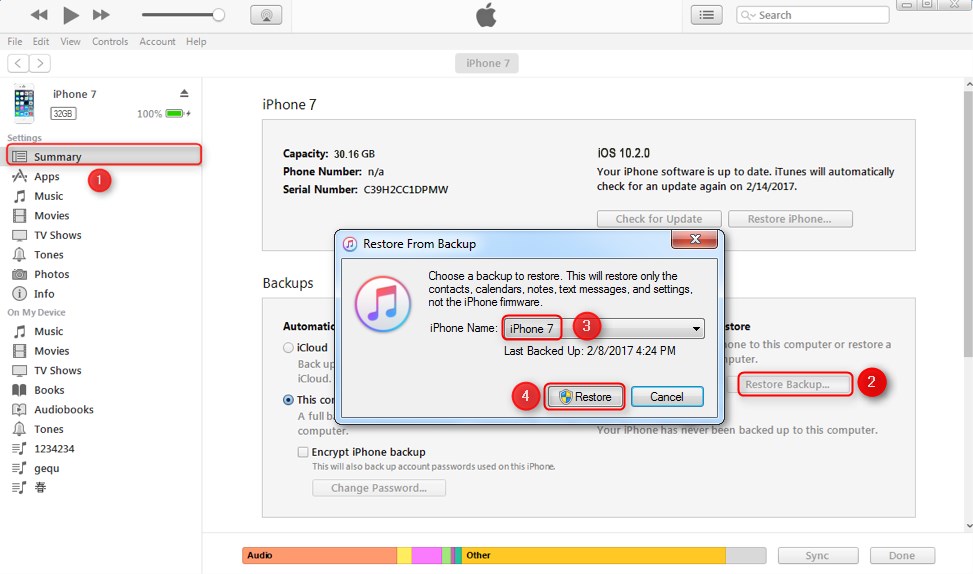
Step 3. If your device is recognized by iTunes, you will see the below interface. Then click your iPhone 7 icon as we show.
Step 4. Click “Summary”, choose “Restore Backup” and select a backup you want to restore. Then click “Restore” to start. If you have set a password to encrypt your backup, iTunes will ask you to enter the password to unlock iTunes backup before restoring. (Please note this feature will remove all your existing data on your device and put all data of a previous iTunes backup to your device).
Step 5. Keep your device connected until the whole restoring progress done. After the progress finished, a note will require you to disconnect your device, just do it. Then your iPhone 7 will restart.
Or you can restore your iPhone 7 on iTunes menu.
Step 1. Click “File”, choose “Devices” and click “Restore from Backup”.

Step 2. Select a backup you want to restore and click “Restore” to start.

If iTunes not working to restore iPhone 7
When using iTunes to restore your iPhone, you may face some issues of iTunes crashing, freezing or can’t restore, you can read our related posts to solve them.
Hope this article will help you restore your iPhone 7 from iTunes backup. If you face any problem, please leave them in comment section below to discuss.
This is nonsense. There are THOUSANDS of people complaining that restoring from backup can take many hours, even days. Yet another half baked Apple screw-up. It can take minutes to store a backup on a computer via iTunes, but many hours to restore to a phone. This is pathetic.
Yes, it’s true that restoring iPhone from backup may take a long time. But undeniably, an iTunes or iCloud backup is always the last lifesaver for our iPhone data and files when we face unexpected data loss. What I personally do, though, is to use third-party apps like DropBox, Google Drive or OneDrive to backup specific iPhone content instead of backing up the whole device.