After you bought a new iPhone like iPhone 7/7 Plus, iPhone 8/8 Plus, or iPhoen X, you will create new contacts, take photos and download favorite songs and videos to it. With the time going by, there would be so much important data stored on your iPhone. Therefore, it seems essential to save these important data to computer in case any accidental damage. But how to backup iPhone?
Actually, iTunes is one nice tool to backup iPhone to computer. In this guide, we will show you how to backup iPhone 7/8/8 Plus/X to computer with iTunes. In addition, we tells you some tips to solve “iTunes won’t backup” problems.
The Tools You Need to Backup iPhone
- An iPhone and one compatible USB cable.
- The latest version of iTunes – iTunes 12.7.
- One Windows/Mac computer.
How to Backup iPhone 7/iPhone 8/iPhone 8 Plus/iPhone X with iTunes
There are two methods to backup iPhone with iTunes. Before starting, you need to download and install the latest version – iTunes 12.7 on your computer.
Go to iTunes device management panel to backup iPhone
Step 1. Open iTunes and connect your iPhone to computer. If it’s the first time for you to connect your device to computer, you need to download and install a driver on computer to make your device recognized by your computer.
Step 2. If a message asks you to unlock your device, Trust Your Computer on your iPhone or something else, just do it.
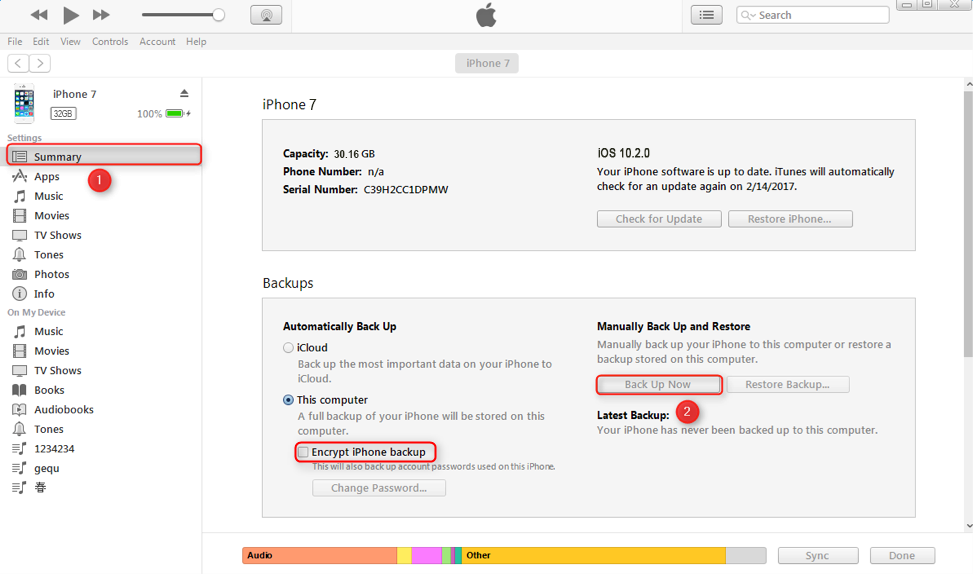
Step 3. If your device is recognized by iTunes, you will see the below interface. Then click your iPhone icon as we show.
Step 4. Click “Summary”, you will see the below interface. If you want to save Health and Activity data from your device, you need to encrypt your backup: Select “Encrypt iPhone backup” as we show and create a memorable password. If you don’t want to save your Health and Activity data, you can make a backup that isn’t encrypted. Just click “Back Up Now”.
Besides, on iTunes menu, you can also find the feature to backup your device.
Step 1. Click “File” on iTunes as we show, choose “Device” and click “Back Up Now”. (On mac, the iTunes menu is on the top left corner of your computer screen when your iTunes is activated.)

Step 2. After clicking “Back Up”, the below note will appear. You can choose whether Back Up Apps or not based on your need.

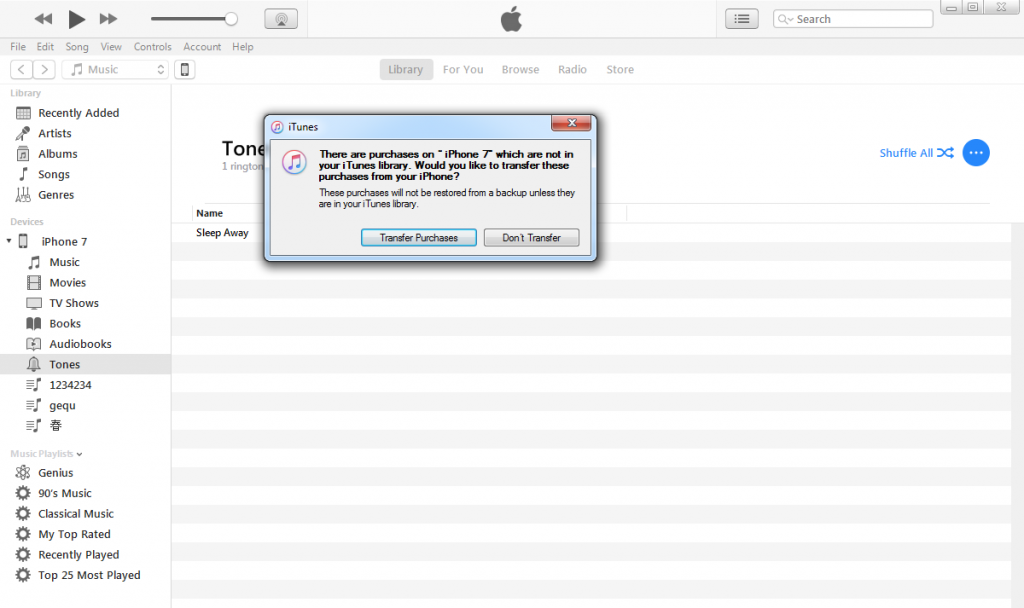
Step 3. After you choose and click whether Back Up Apps or not, you will see the below note. You can choose whether Transfer Purchases or not based on your need. Then wait the whole backing up progress done.
After the process ends, you can see if you have successfully made a backup for your iPhone on iTunes menu > Edit > Devices. If you have made the backup successfully, you will see the name of your device with the date and time that iTunes created the backup.
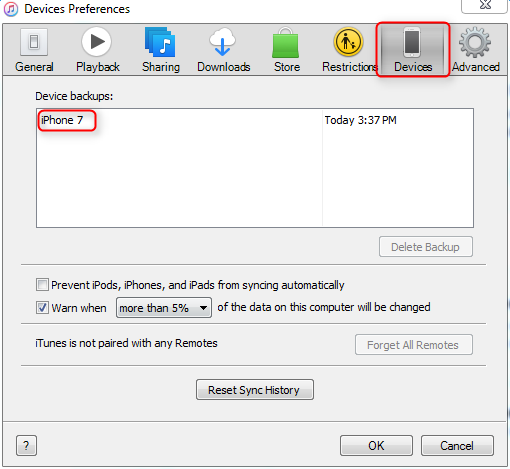
If you are using a Mac computer, the iTunes menu is a little different from that in Windows, you should go to Preferences > Devices to check your iTunes backups for your iPhone 7.
If you can’t backup iPhone with iTunes
When using iTunes to backup your iPhone, you may face some issues of iTunes crashing, freezing or can’t backup, you can read our related posts to solve them.
If this guide helps you in backing up you iPhone with iTunes, please share it with your friends. if you meet any problem during backing up, welcome to share them in comments section.