Research shows that strong bright blue of your display is bad for your eyes. So it would be better to shift your display to the warmer end of the color spectrum after dark. Apple added Night Shift feature in iOS 10.3 that lets your iPhone or iPad automatically adjust the color of the screen to make it easier on your eyes. And with the release of macOS Sierra 10.12.4, you can also use Night Shift on Mac computer now.
Related Reading: New Features of macOS High Sierra You May Like
Night Shift Supported Macs
You can use Night Shift with following Macs:
- MacBook Air (Mid 2012 or newer)
- MacBook Pro (Mid 2012 or newer)
- Mac mini (Late 2012 or newer)
- iMac (Late 2012 or newer)
- Mac Pro (Late 2013 or newer)
- MacBook (Early 2015 or newer)
How to Set up Night Shift on macOS Sierra 10.12.4
- Go to System Preference on your Mac.
- Click on Displays and choose Night Shift tab.
- Then you can set the Night Shift schedule or manually turn on Night Shift until tomorrow. Pull down the Schedule section, you can choose either “Custom” or “Sunset to Sunrise”. If you choose “Sunset to Sunrise”, your computer will determine the sunset and sunrise time according to your computer’s clock and geolocation. In addition, you can drag the Color Temperature slider to increase or decrease the warmth of your display.

How to Use Night Shift on macOS Sierra
How to Quickly Turn on Night Shift on macOS Sierra
Moreover, you can quickly turn on Night Shift from Notification Center. Here’s how to make it:
- Click Notification from the menu bar at the top-right corner of your screen.
- On Today tab, scroll up to reveal the Night Shift setting.
- Turn on Night Shift.
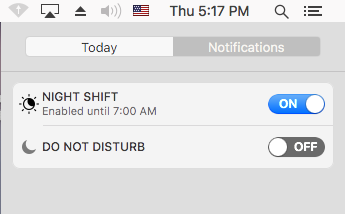
Turn on Night Shift From Notification Center